Hello! Thank you for stopping by today.
Yesterday I created a list of tasks that CTMH Customers should do prior to Close To My Heart closing in June 2024.
I mentioned that one of the things to do is download (and backup) any digital assets purchased (some digital files might have been included with a special promotion–I encourage double-checking before thinking you do not have any digital files). Digital files are listed in the Digital Library.
Here are the steps to find the Digital Library:
Visit my eCommerce website, click the Sign In link, then enter the email address and password you use when you purchase from Close To My Heart.
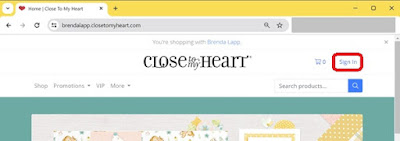 |
| screen snip of my eCommerce Website with Sign In location highlighted |
Once you are signed in, click on your name, then choose Account.
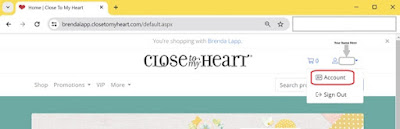 |
| screen snip of my eCommerce Website; Account location highlighted |
On the left side of the screen choose Digital Library; if you are using a mobile phone click the arrow to the right of Account.
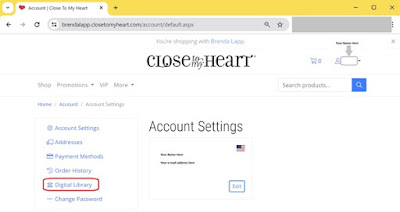 |
| screen snip of my eCommerce Website; Digital Library location highlighted |
All digital assets that you have acquired are listed in your Digital Library. Some of the items could be gifts like the VIP Happy Birthday file shown in the example below. Other files could have been bundled with Black Friday, Cyber Monday or other previous CTMH promotions, or perhaps you purchased a Digital Art Collection that coordinates with one of the Paper Collections. The date the file was added to your Digital Library is included to help you identify when you acquired the digital art and what the file may correspond to.
Click on the Download button to the right of each description to download the file to your device. Where the file is saved depends on your type of device, the browser you are using and if you changed the browser setting for what folder downloads are saved in.
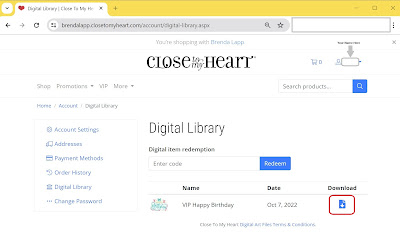 |
| screen snip of my eCommerce Website; Download Button highlighted |
Once the file is downloaded to your device, you will need to unzip it. Since there are many different devices in use by CTMH Customers, I encourage to you use your favorite search engine for a how-to article for unzipping. Once unzipped, you will have *.svg files. Use the software for your digital cutter (Cricut Design Space, Silhouette Studio, etc.) to look at the file.
If you do not have a digital cutter, I still encourage you to download the digital art from your Digital Library. Who knows where your crafting journey will take you? You might be gifted a digital cutter from someone who no longer uses it or you might receive one at a gift giving occasion. You can still double-check the file by opening it in Microsoft Edge. Just double-click on the *.svg and you can see the image in the Edge browser. For the Apple users out there...please use your favorite search engine to learn how to view an *.svg. Alternatively, you could install Cricut Design Space. The software is free, you just need to create an account.
Some of the Close To My Heart Promotions that had a digital component are:
Holiday Cheer (Oct-Nov 2019), Easter Traditions Wood Banners (Mar 2020), Happiest Place (Jul 2020), These Are My People (Mar 2020). I will try to make a list over the next few days and add it to this post. Unfortunately I know any list I create will not be comprehensive since I did not purchase all of the products that had a digital file (Countdown to Christmas in Nov 2023 comes to mind).
I know it is a daunting task, but ideally you will find time to download the digital files you may have purchased as well as any Workshop Guides you might need by the end of April 2024. This will give you an opportunity to verify all of the files are working before Close To My Heart removes access to them on June 15.
Have a good rest of your week.


.jpg)
.jpg)
.jpg)